How Jike's Favorite Button Works
How Jike's favorite button works
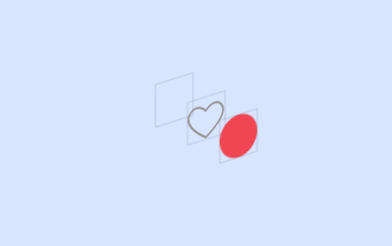
Not long ago, Jike updated to version 2.0. The overall UI became much more plain, but there are still some refined details, such as the favorite button. The effect is shown below, and the code has been uploaded to GitHub.

To achieve this effect, three elements are needed:
- The bottom layer uses a maskLayer to create a heart-shaped view
- The middle layer adds a hollow ImageView to display the heart outline
- The top layer needs a view to display the fill animation
I will not go into too much detail about maskLayer here. Creating a heart-shaped maskLayer in code would be too troublesome. Although tools like paintcode exist, using an image to create the maskLayer is the best solution:
1
2
3
4
5
6
7
8
9
- (void)setMaskImage:(UIImage *)maskImage{
    _maskImage = maskImage;
    if (!_maskLayer) {
        self.maskLayer = [CALayer layer];
        self.maskLayer.frame = CGRectMake(0,0, _maskImage.size.width, _maskImage.size.height);
        self.layer.mask = _maskLayer;// frame must be set
    }
    self.maskLayer.contents = (id)[_maskImage CGImage];
}
This also confirms the fact that Jike uses an image to create the maskLayer. If you extract the Assets.car file from the ipa package, you will find that this file is actually Images.xcassets. However, it cannot be opened directly on Mac, so you need to use the ThemeEngine tool. After browsing its contents, you can find:

Clearly, the first image is used to create the maskLayer, and the other one is used to create the second element. You only need to add a simple ImageView:
1
2
3
4
5
6
7
8
9
10
- (void)setBorderImage:(UIImage *)borderImage{
    _borderImage = borderImage;
    if (!_borderImageView) {
        self.borderImageView = [[UIImageView alloc] init];
        self.borderImageView.frame = CGRectMake(0,0, _borderImage.size.width, _borderImage.size.height);
        [self addSubview:_borderImageView];
    }
    self.borderImageView.image = _borderImage;
    [self sendSubviewToBack:_borderImageView];
}
Finally, use setFillColor to create fillView, and set its transform to support the animation that comes later:
1
2
3
4
5
6
7
8
9
10
- (void)setFillColor:(UIColor *)fillColor{
    _fillColor = fillColor;
    if (!_fillView) {
        self.fillView = [[UIView alloc] initWithFrame:self.bounds];
        self.fillView.layer.cornerRadius = self.bounds.size.width * 0.5f;
        self.fillView.transform = CGAffineTransformMakeScale(0, 0);
        [self addSubview:_fillView];
    }
    self.fillView.backgroundColor = _fillColor;
}