WeChat Mini Program
WeChat Mini Program
Implementation Principles
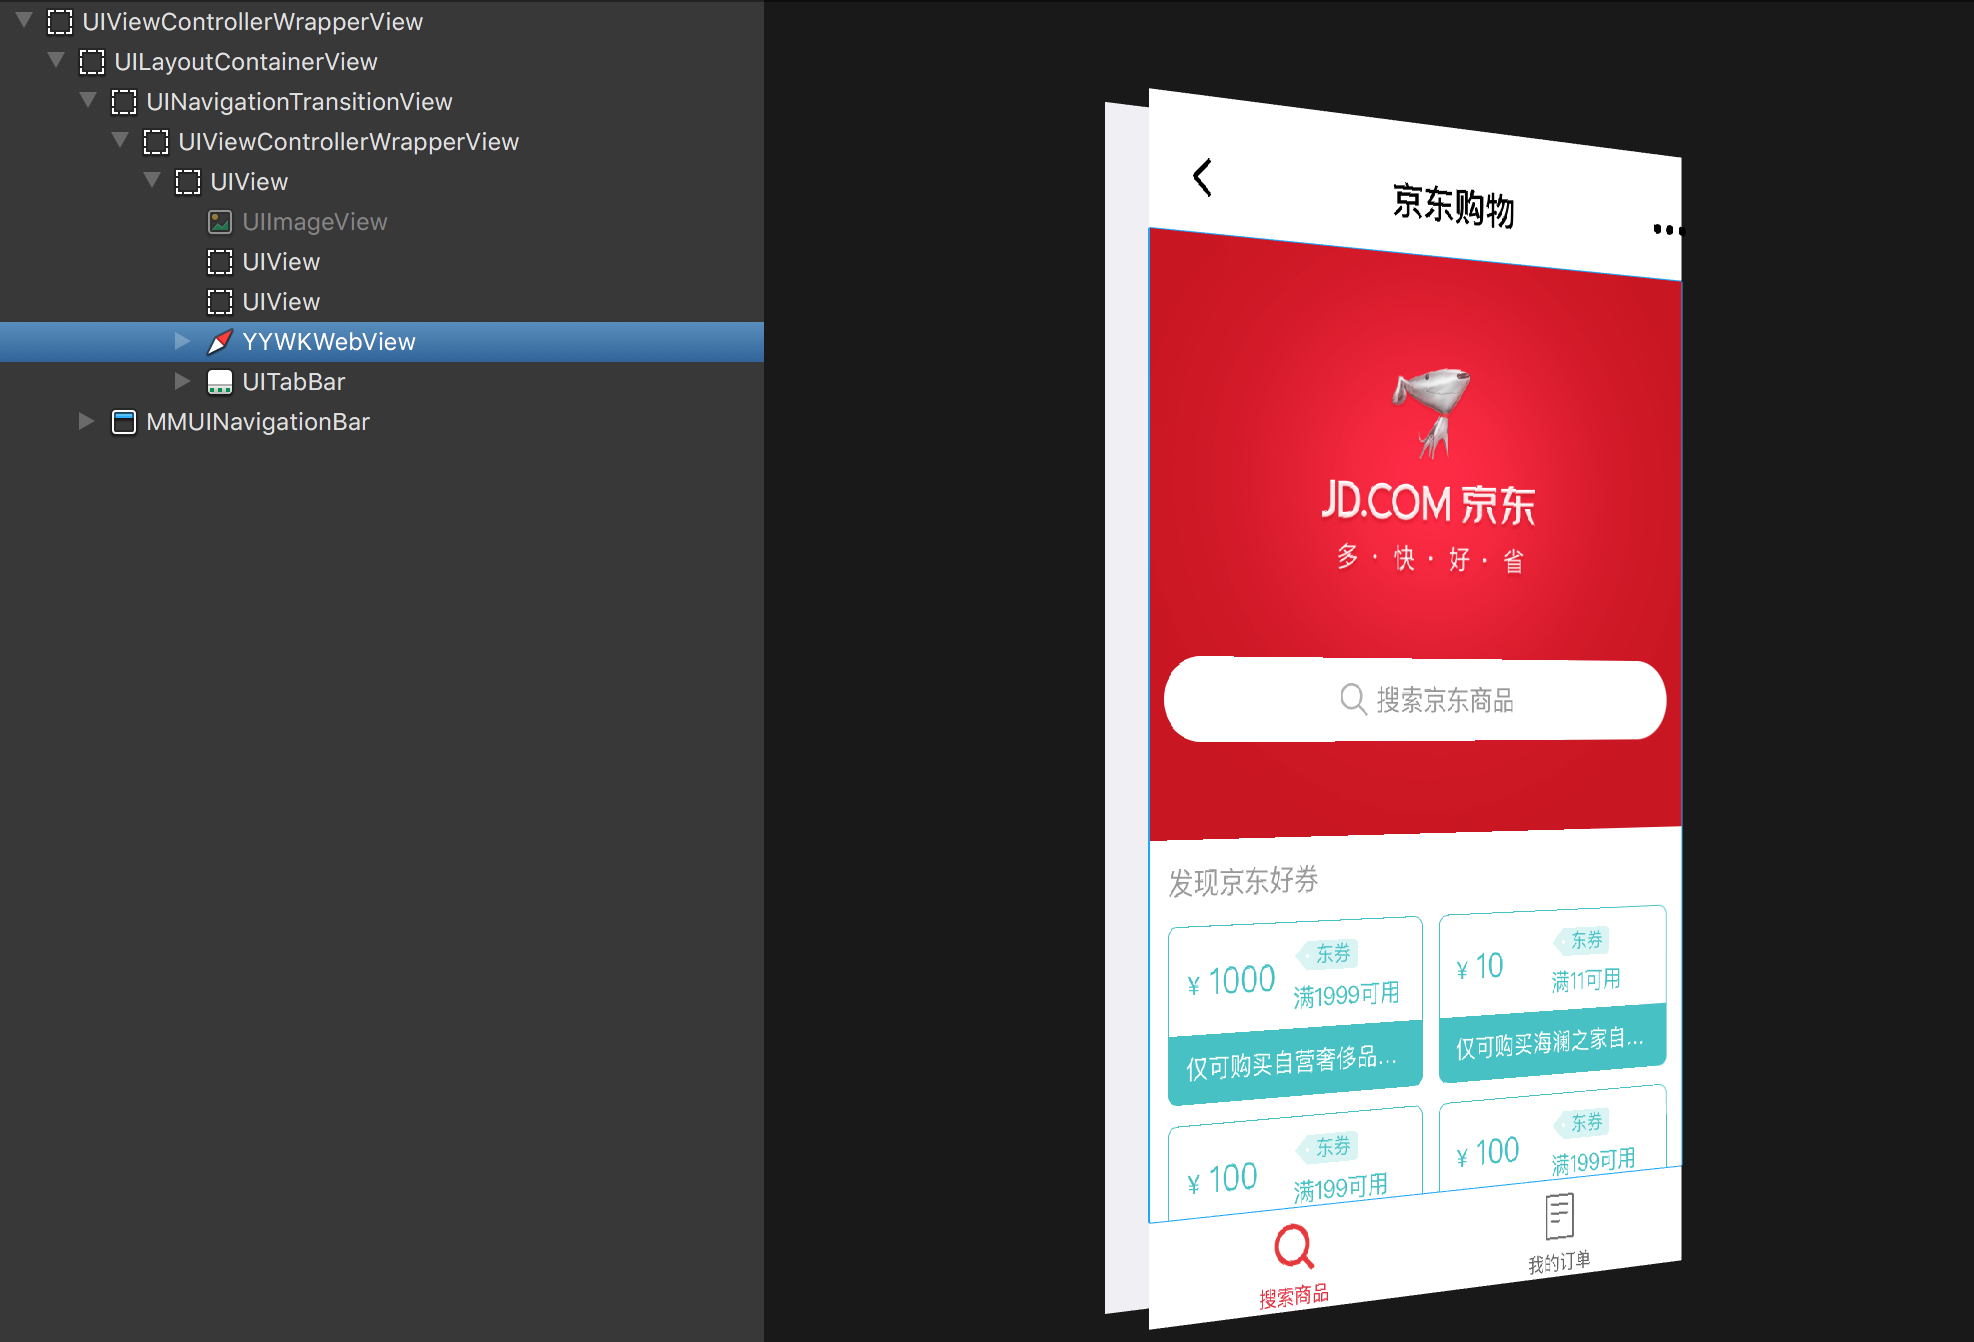
I had long suspected that the WeChat Mini Program implementation was similar to react-native, but in fact the generated result is not a native view. Instead, it is in the form of HTML + CSS, and what is ultimately presented to users is a WebView. Page navigation is still native, though. On iOS, that means one ViewController contains one WebView, and navigation is handled through UINavigationController. Of course, page switching uses UITabBarController. The figure below shows the view hierarchy of the JD Shopping mini program. You can see that the navigation bar uses UINavigationBar, content rendering uses WKWebView, and the bottom control used for switching views is UITabBar. This native + WebView implementation really makes development simple while still providing a relatively good user experience.
Getting Started
Mini program development is relatively simple. First, you need to understand the basics of JS, CSS, and HTML. Second, you must carefully read the development documentation, as well as the official demo DEMO.
Displaying a List
Mini programs do not have a control like UITableView on iOS. To display a list, you must bind an array to a component using wx:for and then render it. Define an array named items in the .js file:
1
2
3
4
5
Page({
  data: {
    items:[],
  },
 })
Request data from the API and assign it to items:
1
2
3
4
5
6
7
8
9
10
11
12
13
14
15
16
17
Page({
  data: {
    items:[],
  },
  onLoad: function() {
    var that = this;
    wx.request({
      url: Url,
      method: 'GET',
      success: function(res){
        that.setData({
          items: res.data.result,
        })
      },
    })
  },
 })
At this point the data is ready. Next comes how to display it in a list, for example in .wxml:
1
2
3
4
5
6
<view class="contain">
    <view wx:for="{{items}}" wx:key="{{item.id}}">
     <text>{{item.text}}</text>
     <text>{{index}}</text>
    </view>
</view>
Note that <view wx:for="{{items}}"> here is essentially equivalent to a Cell. It is not a container view for all Cells. item is the default array element and index is the default index. Of course, the default values can be changed. For details, see the official documentation on list rendering. wx:key is used to identify the uniqueness of each Cell and can improve list rendering performance.
When data changes trigger rerendering in the render layer, components with keys will be reconciled. The framework ensures that they are reordered rather than recreated, which helps preserve component state and improves list rendering efficiency.
Clicking a Cell
In general, we use bindtap for click events, so binding a click event to a Cell looks like this:
1
2
3
4
5
6
<view class="contain">
    <view wx:for="{{items}}" wx:key="{{item.id}}" bindtap="cellAction">
     <text>{{item.text}}</text>
     <text>{{index}}</text>
    </view>
</view>
Then implement the corresponding method in .js:
1
2
3
4
5
Page({
  cellAction(){
    console.log('action')
  }
})
Now, clicking the Cell will print action in the console.
Page Navigation and Passing Parameters
For example, if tapping a Cell should navigate to a detail page called Detail (do not forget to configure the page in app.json), cellAction could be written like this:
1
2
3
4
5
6
7
Page({
  cellAction(){
    wx.navigateTo({
      url: './detail',
    })
  }
})
This example is obviously not typical because it does not pass parameters. In a mini program, there are three ways to pass data between pages:
- Route parameters
- Global variables
- Local storage
- Route parameters:
1
2
3
4
5
6
7
8
9
10
Page({
  cellAction(object){
    var id = this.data.items[0].id;
    var text = this.data.items[0].text;
    console.log(id);
    wx.navigateTo({
      url: './detail?id=' + id + '&text=' + text,
    })
  },
})
For example, the final url becomes ./detail?id=1&text=test, which is equivalent to passing two parameters, id and text. On the next page, the data can be read like this:
1
2
3
4
5
6
7
8
9
// detail.js
Page({
  onLoad:function(options){
    var id = options.id;
    var text = options.text;
    console.log(id);
    console.log(text);
  },
})
Note: parameters can only be retrieved in onLoad.
- Global variables:
First, define a global variable in app.js, such as globalData, and add a parameter property to store the data.
1
2
3
4
5
6
7
8
9
//app.js
App({
  onLaunch: function () {

  },
  globalData:{
    parameter:null
  }
})
Then set the parameter. Do not forget var app = getApp().
1
2
3
4
5
6
7
8
9
10
11
12
13
14
15
var app = getApp()

Page({
  cellAction(object){
    var id = this.data.items[0].id;
    var text = this.data.items[0].text;
    app.globalData.parameter = {
      "id" : id,
      "text" : text
    }
    wx.navigateTo({
      url: './detail',
    })
  },
})
To retrieve the parameter, you also need to get the app object:
1
2
3
4
5
6
7
8
9
10
// detail.js
var app = getApp()
Page({
  onLoad:function(options){
    var id = app.globalData.parameter.id;
    var text = app.globalData.parameter.text;
    console.log(id);
    console.log(text);
  },
})
- Local storage:
1
2
3
4
5
6
7
8
9
cellAction(object){
    var id = this.data.items[0].id;
    var text = this.data.items[0].text;
    wx.setStorageSync("id",id);
    wx.setStorageSync("text",text);
    wx.navigateTo({
      url: './detail',
    })
  },
Retrieve the data:
1
2
3
4
5
6
7
8
9
10
// detail.js
var app = getApp()
Page({
  onLoad:function(options){
    var id = wx.getStorageSync("id");
    var text = wx.getStorageSync("text");
    console.log(id);
    console.log(text);
  },
})
In the examples above, the first item in the array is always passed. So how do we pass the corresponding item instead? We need to use dataset. The official documentation defines it like this:
Data can be defined on a component, and that data will be passed to SERVICE through events. Syntax: start with
data-, use hyphens to connect multiple words, and do not use uppercase letters (uppercase letters will be converted to lowercase automatically), such asdata-element-type. In the end, hyphens inevent.target.datasetwill be converted to camelCase, such aselementType.
Going back to the previous example, we add data-index="{{index}}":
1
2
3
4
5
6
<view class="contain">
    <view wx:for="{{items}}" wx:key="{{item.id}}" bindtap="cellAction" data-index="{{index}}">
     <text>{{item.text}}</text>
     <text>{{index}}</text>
    </view>
</view>
As mentioned earlier, index is the default index object. At this point, you can get the index in the cellAction method:
1
2
3
4
5
6
7
8
9
10
Page({
  cellAction(object){
    var index = object.currentTarget.dataset.index;
    var id = this.data.items[index].id;
    var text = this.data.items[index].text;
    wx.navigateTo({
      url: './payFail?id=' + id + '&text=' + text,
    })
  },
})
Retrieval method:
1
var index = object.currentTarget.dataset.index;
Dynamically Changing Styles
A simple and brute-force way is to use conditional rendering to show different components. From a visual standpoint, this can also achieve the effect of changing styles:
1
2
    <view class="class1" wx:if="{{length > 5}}"> 1 </view>
    <view class="class3" wx:else> 3 </view>
This is obviously not elegant. The official documentation mentions that styles can also be controlled through style, and style can accept dynamic styles. For example, changing the text color after a tap:
Define a text color variable:
1
2
3
4
5
Page({
  data: {
    textColor: "red"
  },
 })
In the view, of course, you need to specify textColor to display the text color:
1
<text bindtap="change" style="color: {{textColor}}" >12321</text>
Tap to execute the change method:
1
2
3
4
5
6
change(){
    var color = "green"
    this.setData({
      textColor : color
    })
  },