本文转载自Esoft Mobile,略有修改
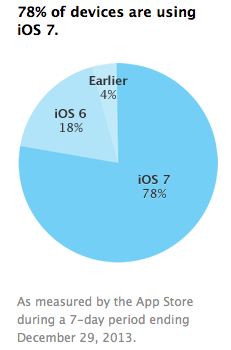
前段时间,苹果在它的开发者网站上放出了iOS系统安装比例,其中iOS7占到78%,iOS6占18%,剩余4%是iOS6以下版本。我们也借此机会将手上正在进行的两个项目都升级到支持iOS6及以上版本呢,有一种幸福来的太突然的赶脚,要知道在此之前我们都还在支持iOS4.3版本。 
根据苹果另外一条消息,我们需要按照iOS7风格设计我们的Apps,至于iOS6系统,也没有必要为这部分用户做两份设计,尽量向iOS7风格靠齐吧。由于iOS7简约的风格,基本上通过设置组件的颜色就能够满足大部分色设计需求,所以本文的主要内容会讲iOS6实现iOS7扁平化的一些技巧。 
iOS6扁平化
这部分我们主要讲解在iOS6上实现扁平化,各个控制怎么设置。并且大部分通过各个控件UIAppearance协议做全局性的设置。
辅助
我们通常要判断不同的系统版本,我是通过下面的宏进行判断的:
1
#define IOS7_OR_LATER ([[[UIDevice currentDevice] systemVersion] compare:@"7.0"] != NSOrderedAscending)
由于很多地方iOS7可以直接设置颜色,而iOS6却只能设置图片,所以可以使用下面方法直接通过颜色生成一个纯色的图片:
1
2
3
4
5
6
7
8
9
10
11
+ (UIImage *)imageWithColor:(UIColor *)color size:(CGSize)size
{
    CGRect rect = CGRectMake(0, 0, size.width, size.height);
    UIGraphicsBeginImageContext(rect.size);
    CGContextRef context = UIGraphicsGetCurrentContext();
    CGContextSetFillColorWithColor(context, [color CGColor]);
    CGContextFillRect(context, rect);
    UIImage *image = UIGraphicsGetImageFromCurrentImageContext();
    UIGraphicsEndImageContext();
    return image;
}
布局
iOS7中界面会从屏幕的(0, 0)点开始绘制,所以默认情况下你的内容通常会和 statusBar 和 navigationBar 冲突,如果为了省事的话,或者你的 NavigationBar 和 TabBar压根儿就不透明,那你可以直接给 viewController 的 edgesForExtendedLayout 属性值为:UIRectEdgeNone。当然你如果想体现iOS7内容为主的风格,也想将内容显示在半透明的 Bar 下,那你可以严格判断系统版本调整布局了。通常建议将 edgesForExtendedLayout 设置为 UIRectEdgeBottom,这样如果ViewController中为 tableView 或 scrollView 时,内容可以显示到半透明的 navigationBar 下,工作量也不是很大。
UINavigationBar
在iOS7风格中,导航栏通常是一个纯色的背景颜色,直接设置 barTintColor 就行,而iOS6中,给导航栏设置 tintColor,系统也会默认加上渐变,不够扁平,所以只能设置背景图片了:
1
2
3
//iOS6
[[UINavigationBar appearance] setBackgroundImage:[UIImage imageWithColor:navigationBarColor size:CGSizeMake(1, 44)]
    forBarMetrics:UIBarMetricsDefault];
导航栏 title 的颜色也不同,iOS7默认为黑色,而iOS6默认为白色,而且字体大小也不一样,所以还是统一设置标题字体大小、颜色,并去掉文字阴影:
1
2
3
4
5
6
//Universal
[[UINavigationBar appearance] setTitleTextAttributes:
         @{ NSForegroundColorAttributeName: [UIColor whiteColor],
            NSFontAttributeName: [UIFont boldSystemFontOfSize:17],
            UITextAttributeTextShadowOffset: [NSValue valueWithUIOffset:UIOffsetZero]
            }];
若iOS 6下这段代码无效果。替换成
1
2
3
4
5
6
7
8
9
10
11
12
13
14
15
16
17
18
if (IOS7_OR_LATER) {
        NSShadow *shadow = [[NSShadow alloc] init];
        shadow.shadowColor = [UIColor clearColor];
        shadow.shadowBlurRadius = 0.0;
        shadow.shadowOffset = CGSizeMake(0, 0);
        [[UINavigationBar appearance] setTitleTextAttributes:
         @{ NSForegroundColorAttributeName: [UIColor blackColor],
            NSFontAttributeName: [UIFont boldSystemFontOfSize:17],
            NSShadowAttributeName: shadow
            }];
    }
    else{
        [[UINavigationBar appearance] setTitleTextAttributes:
         @{ UITextAttributeTextColor: [UIColor blackColor],
            UITextAttributeFont: [UIFont boldSystemFontOfSize:17],
            UITextAttributeTextShadowOffset: [NSValue valueWithUIOffset:UIOffsetZero]
            }];
    }
1
2
3
4
//iOS6
[[UIBarButtonItem appearance] setBackgroundImage:[UIImage new]
    forState:UIControlStateNormal
    barMetrics:UIBarMetricsDefault];
iOS7中导航栏上的按钮已经不被圆角按钮包围了,而iOS6中不管你怎么设置 UIBarButtonItem 的 style 属性都去不掉讨厌的 border,可能很多人会想通过创建 CustomView 类型的 button,其实不用那么麻烦:
有人会说,你别高兴得太早,那导航栏的返回按钮怎么办?能去掉iOS6上带剪头和圆角的border吗?这个都搞不定,我还敢在这儿发文章显摆吗?看码:
1
2
3
4
5
6
7
8
9
//iOS6
[[UIBarButtonItem appearance] setBackButtonBackgroundImage:[[UIImage imageNamed:@"buttonItem_back"] resizableImageWithCapInsets:UIEdgeInsetsMake(0, 18, 0, 0)]
    forState:UIControlStateNormal
    barMetrics:UIBarMetricsDefault];
[[UIBarButtonItem appearance] setBackButtonTitlePositionAdjustment:UIOffsetMake(5, 0)
    forBarMetrics:UIBarMetricsDefault];
[[UIBarButtonItem appearance] setTitleTextAttributes:
         @{ UITextAttributeFont: [UIFont systemFontOfSize:17],
            UITextAttributeTextShadowOffset: [NSValue valueWithUIOffset:UIOffsetZero]} forState:UIControlStateNormal];
第一段代码给返回按钮设置一个背景图片,当然这个背景图片就做成和iOS7返回按钮那个剪头一样就好了, Back 可能文字和剪头靠的太紧,没关系,通过 setBackButtonTitlePositionAdjustment: 设置一下文字的偏移就好了,最后因为iOS6中 BarButtonItem 中的文字比 iOS7 小,所以统一设置一下吧。
UITabBar
和 NavigationBar 一样,iOS6中给 TabBar 设置 tintColor 也不够扁平,还是老老实实设置背景图片,并去掉 Tab 选中时的高光效果:
1
2
3
//iOS6
[[UITabBar appearance] setBackgroundImage:[UIImage imageWithColor:RGB(245, 245, 245) size:CGSizeMake(1, 49)]];
[[UITabBar appearance] setSelectionIndicatorImage:[UIImage new]];
iOS6中 Tab 选中后,图片默认会加上高光效果,title默认为白色,而iOS7中默认为选中后图片和文字默认都变为 TabBar 的 tintColor 颜色,所以这里的处理方法是准备两套 tabBarItem 的图标,默认状态和选中状态,iOS7直接调用initWithTitle: image: selectedImage:方法初始化 tabBarItem,iOS6在初始化后,再通过 setFinishedSelectedImage: withFinishedUnselectedImage:方法设置默认状态和选中状态下的图标,我通常会给 UITabBarItem 增加一个分类,新增一个统一的初始化方法:
1
2
3
4
5
6
7
8
9
10
11
12
13
@implementation UITabBarItem (Universal)
+ (instancetype)itemWithTitle:(NSString *)title image:(UIImage *)image selectedImage:(UIImage *)selectedImage
{
    UITabBarItem *tabBarItem = nil;
    if (IOS7_OR_LATER) {
        tabBarItem = [[UITabBarItem alloc] initWithTitle:title image:image selectedImage:selectedImage];
    } else {
        tabBarItem = [[UITabBarItem alloc] initWithTitle:title image:nil tag:0];
        [tabBarItem setFinishedSelectedImage:selectedImage withFinishedUnselectedImage:image];
    }
    return tabBarItem;
}
@end
上面提到是手动代码创建UITabBarItem方法,但是有些一开始是通过xib或者storyboard已经创建好了可以通过这样方式设置
1
2
3
4
5
6
7
8
9
10
11
12
13
14
15
16
17
18
19
	UITabBarItem *firstItem = self.tabbarController.tabBar.items.firstObject;
    UITabBarItem *secondItem = self.tabbarController.tabBar.items[1];
    UITabBarItem *thirdItem = self.tabbarController.tabBar.items[2];
    UITabBarItem *lastItem = self.tabbarController.tabBar.items.lastObject;

    if (IOS7_OR_LATER) {
        firstItem.image = [UIImage imageNamed:@"recomendNormal"];
        firstItem.selectedImage = [[UIImage imageNamed:@"recomendHighLight"] imageWithRenderingMode:UIImageRenderingModeAlwaysOriginal];


        secondItem.image = [UIImage imageNamed:@"prodListNormal"];
        secondItem.selectedImage = [[UIImage imageNamed:@"prodListHighLight"] imageWithRenderingMode:UIImageRenderingModeAlwaysOriginal];


    }
    else{
        [firstItem setFinishedSelectedImage:[UIImage imageNamed:@"recomendHighLight"] withFinishedUnselectedImage:[UIImage imageNamed:@"recomendNormal"]];
        [secondItem setFinishedSelectedImage:[UIImage imageNamed:@"prodListHighLight"] withFinishedUnselectedImage:[UIImage imageNamed:@"prodListNormal"]];
    }
标题单独设置:
1
2
3
4
5
//iOS6
[[UITabBarItem appearance] setTitleTextAttributes:
            @{ UITextAttributeTextShadowOffset: [NSValue valueWithUIOffset:UIOffsetMake(0, 0)],
               UITextAttributeTextColor: tabBarTintColor }
    forState:UIControlStateSelected];
UIToolbar
UIToolbar 和 UINavigationBar 相似,建议通过设置背景图片,上面的 item 和 NavigationBar 的 item 设置通用。
UISegmentControl
像 UISegmentControl 通过自定义或者第三方控件,很容易实现 iOS6 和 iOS7 一致风格,如果你就想用系统的控件让 iOS6 实现 iOS7 的风格也不是没有办法。我们可以设置 segment 部分选中状态和非选中状态下的背景图片,segment 之间的分割线图片。因为 iOS6 上 UISegmentControl 的 title 字体比 iOS7 上大,也可以一并做一下修改:
1
2
3
4
5
6
7
8
9
10
11
12
13
14
15
16
17
18
19
20
21
//iOS6
[[UISegmentedControl appearance] setBackgroundImage:[UIImage imageWithColor:selectedColor size:CGSizeMake(1, 29)]
    forState:UIControlStateSelected
    barMetrics:UIBarMetricsDefault];
[[UISegmentedControl appearance] setBackgroundImage:[UIImage imageWithColor:normalColor size:CGSizeMake(1, 29)]
    forState:UIControlStateNormal
    barMetrics:UIBarMetricsDefault];
[[UISegmentedControl appearance] setDividerImage:[UIImage imageWithColor:selectedColor size:CGSizeMake(1, 29)]
    forLeftSegmentState:UIControlStateNormal
    rightSegmentState:UIControlStateSelected
    barMetrics:UIBarMetricsDefault];
[[UISegmentedControl appearance] setTitleTextAttributes:@{
        UITextAttributeTextColor: selectedColor,
        UITextAttributeFont: [UIFont systemFontOfSize:14],
        UITextAttributeTextShadowOffset: [NSValue valueWithUIOffset:UIOffsetMake(0, 0)] }
    forState:UIControlStateNormal];
[[UISegmentedControl appearance] setTitleTextAttributes:@{
        UITextAttributeTextColor: normalColor,
        UITextAttributeFont: [UIFont systemFontOfSize:14],
        UITextAttributeTextShadowOffset: [NSValue valueWithUIOffset:UIOffsetMake(0, 0)]}
    forState:UIControlStateSelected];
通过 appearance 只能到这里了,还差 border 和 小圆角。 鉴于 UISegmentControl 设置还需要每个控件单独设置,所以还是推荐封装一下。
1
2
3
4
5
6
if (!IOS7_OR_LATER) {
    self.segmentControl.layer.borderColor = selectedColor;
    self.segmentControl.layer.borderWidth = 1.0f;
    self.segmentControl.layer.cornerRadius = 4.0f;
    self.segmentControl.layer.masksToBounds = YES;
}
结束
就写这么多吧,如果没有找到你想拍扁的控件,自己动手吧,如果你懒,那就去 GitHub 上找找吧 :]


