Some Notes on Image Rendering
If I had to name the bug from earlier projects that I still remember clearly, I would say memory overflow (OOM) without hesitation. At the time, I could not find the root cause from either the dSYM or third-party crash reports, and I rarely encountered it during development. What I now know is that the issue was OOM caused by rendering a batch of high-resolution images.
Memory overflow is easy to understand from the name alone. In the traditional sense, OOM means the current app has reached the “high water mark,” which is the system’s memory limit for a single app. The system will then kill the app, handled by Jetsam. That is enough background on OOM. The rest of this article focuses on several image rendering topics.
By now, everyone should know that images go through a decompression process from loading to final rendering. The rough flow is shown below (image from Image and Graphics Best Practices):
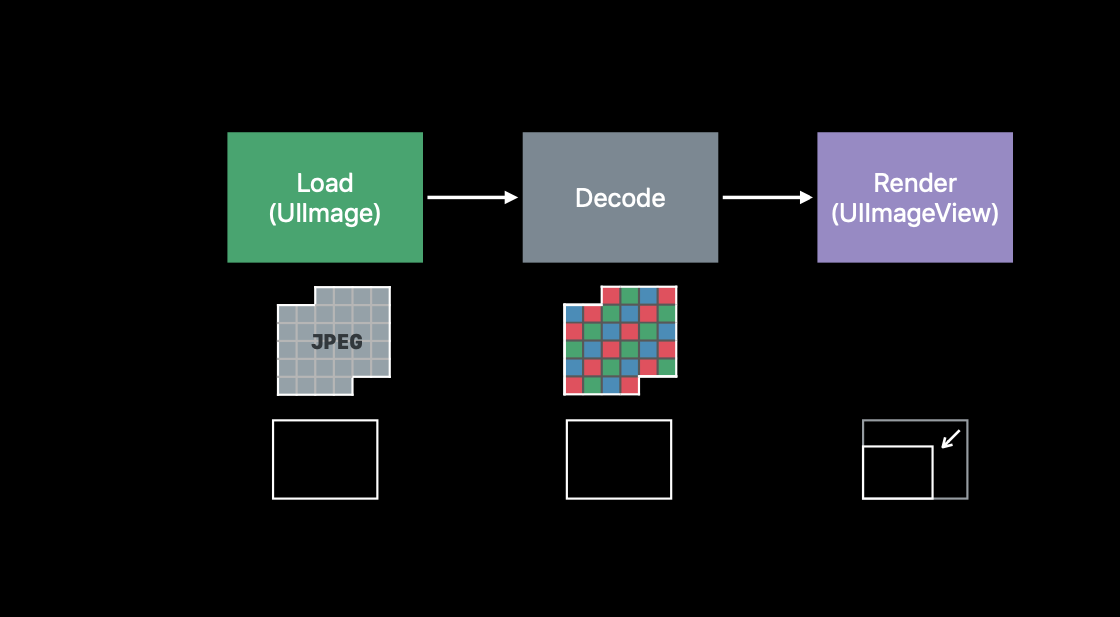
In simple terms, decoding is the process of converting an image into a bitmap. So what exactly is a bitmap?
Bitmap
Wikipedia gives the following explanation:
In computing, a bitmap is a mapping from some domain (for example, a range of integers) to bits. It is also called a bit array or bitmap index.The more general term pix-map refers to a map of pixels,
Put simply, a bitmap is a pixel image. We can obtain bitmap information for an image with the following method:
1
2
3
4
5
6
7
8
9
10
11
extension UIImage {

    var decodeData: Data? {
        guard let cgimage = cgImage
            , let dataProvider = cgimage.dataProvider
            , let rawData = dataProvider.data as Data? else {
                return nil
        }
        return rawData
    }
}
Take the following 48 * 48 image as an example:

Using the method above, the beginning of the bitmap data we get looks like this (there are 48 * 48 such hexadecimal values). In fact, these values correspond to the color information that should be displayed on each pixel.
ffffffff ffffffff ffffffff ffffffff ffffffff ffffffff ffffffff ffffffff ffffffff ffffffff ffffffff ffffffff ffffffff ffffffff ffffffff ffffffff ffffffff fffbf9ff ffd5c8ff ffb19bff ff9b7eff ff8765ff ff7e59ff ff7750ff ff7750ff ff7e59ff ff8765ff ff9b7eff ffb19bff ffd5c8ff fffbf9ff ffffffff ffffffff ffffffff ffffffff ffffffff ffffffff ffffffff ffffffff ffffffff ffffffff ffffffff ffffffff ffffffff ffffffff ffffffff ffffffff ffffffff ffffffff ffffffff ffffffff ffffffff ffffffff ffffffff ffffffff ffffffff ffffffff ffffffff ffffffff ffffffff ffffffff fff6f3ff ffcbbcff ff9f84ff ff7953ff ff734bff ff734bff ff734bff ff734bff ff734bff ff734bff ff734bff ff734bff ff734bff ff734bff ff734bff ff734bff ff7953ff ff9f84ff ffcbbcff fff6f3ff ffffffff ffffffff ffffffff
Let’s verify it. The first seventeen pixels are all white, which matches expectations because the top-left area is white. At the eighteenth pixel, the value becomes fffbf9ff. If we enlarge the image and compare it, we get:
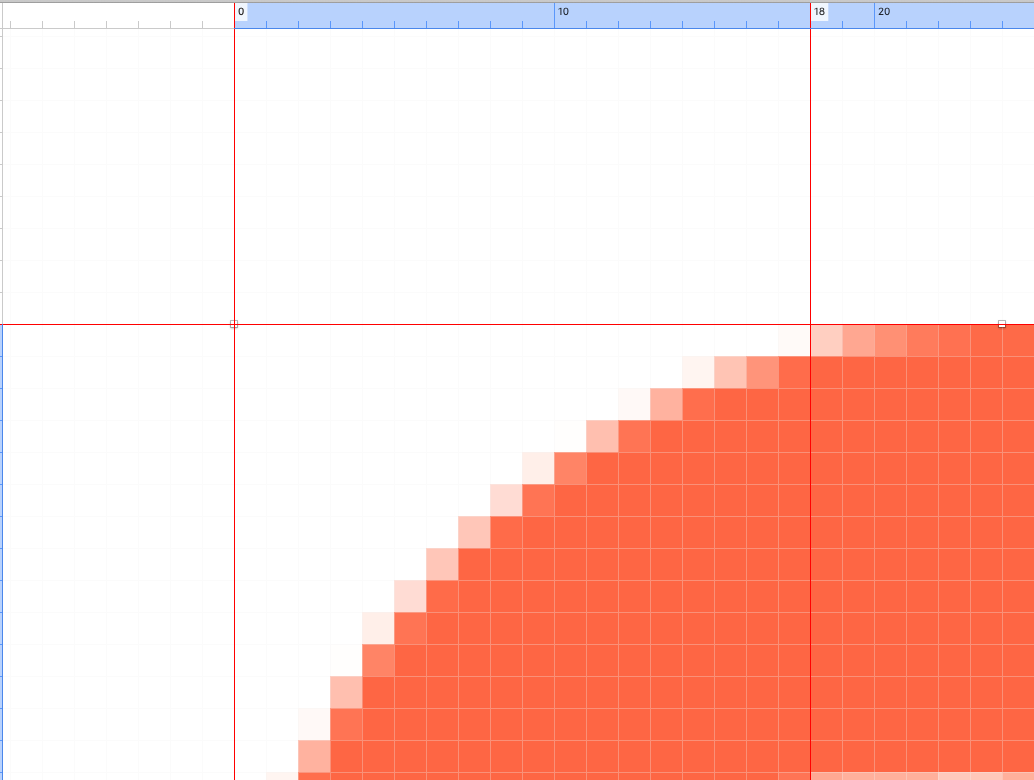
The eighteenth pixel is fffbf9ff. More specifically, this color value is the light red shown above. The last two digits, ff, represent the alpha value. At this point, we have a clear understanding of what a bitmap is.
Memory Usage
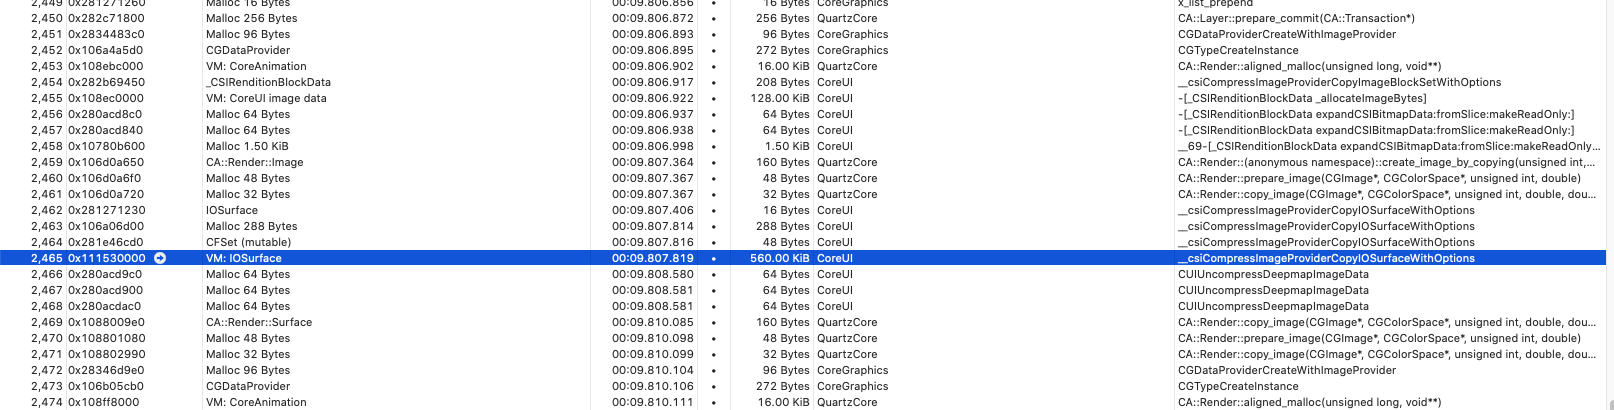
Back to the OOM issue caused by decompressing high-resolution images. The first question is: how much memory does one image consume during decompression? The answer is horizontal pixels × vertical pixels × 4, in bytes. Let’s verify that. This time, we’ll use a slightly larger color PNG image with a resolution of 400 * 350, so the theoretical memory required for decompression is 400 * 350 * 4 = 547k. The test device is an iPhone X running 12.3.0, and Instruments Allocations reports 560k, which is very close to the theoretical value.
Why emphasize color images? You may already have guessed that decompression cost is different for a color image and for an image composed only of black and white. For example, the following image is also a 400 * 350 PNG:

The decompression memory usage is only 288k, and the calculation is 400 * 350 * 2 = 273k.

At this point, some people may wonder whether pure red, pure green, or pure blue would consume the same amount of memory. Sorry, that is not the case. To explain this, we need to introduce the concept of color spaces. The color spaces currently supported by Apple include the following types:
- Gray spaces, used for grayscale display and printing; see Gray Spaces
- RGB-based color spaces, used mainly for displays and scanners; see RGB-Based Color Spaces
- CMYK-based color spaces, used mainly for color printing; see CMY-Based Color Spaces
- Device-independent color spaces, such as Lab, used mainly for color comparisons, color differences, and color conversion; see Device-Independent Color Spaces
- Named color spaces, used mainly for printing and graphic design; see Named Color Spaces
- Heterogeneous HiFi color spaces, also referred to as multichannel color spaces, primarily used in new printing processes involving the use of red-orange, green and blue, and also for spot coloring, such as gold and silver metallics; see Color-Component Values, Color Values, and Color
For iOS specifically, there are these options:
| CS | Pixel format and bitmap information constant | Availability |
|---|---|---|
| Null | 8 bpp, 8 bpc, kCGImageAlphaOnly | Mac OS X, iOS |
| Gray | 8 bpp, 8 bpc, kCGImageAlphaNone | Mac OS X, iOS |
| Gray | 8 bpp, 8 bpc, kCGImageAlphaOnly | Mac OS X, iOS |
| RGB | 16 bpp, 5 bpc, kCGImageAlphaNoneSkipFirst | Mac OS X, iOS |
| RGB | 32 bpp, 8 bpc, kCGImageAlphaNoneSkipFirst | Mac OS X, iOS |
| RGB | 32 bpp, 8 bpc, kCGImageAlphaNoneSkipLast | Mac OS X, iOS |
| RGB | 32 bpp, 8 bpc, kCGImageAlphaPremultipliedFirst | Mac OS X, iOS |
| RGB | 32 bpp, 8 bpc, kCGImageAlphaPremultipliedLast | Mac OS X, iOS |
Going back to the calculation above, the table shows the pixel format and bitmap information constant for each color space (CS), including the total bits per pixel (bpp). For color images, the space used for decompression must be RGB, which corresponds to 32 bpp (I will mention 16 bpp later). Since 32 bits / 8 = 4 bytes, the formula is horizontal pixels × vertical pixels × 4.
For images made only of black and white, the corresponding color space is gray (official explanation):
Gray spaces typically have a single component, ranging from black to white, as shown in Figure 2-1. Gray spaces are used for black-and-white and grayscale display and printing. A properly plotted gray space should have a fifty percent value as its midpoint.

So the memory usage formula becomes horizontal pixels × vertical pixels × 2 (which is why the table shows 8 bpp). This explanation also applies to UILabel rendering. If you do not believe it, try comparing the memory used when displaying red text versus black-and-white text.
Also, you may think of UIColor’s initializer that uses the HSB color space:
1
public init(hue: CGFloat, saturation: CGFloat, brightness: CGFloat, alpha: CGFloat)
HSB is indeed a color space, but it is also based on RGB. Wikipedia has a corresponding explanation here, and the official documentation also notes that the final representation is still RGB.
RGB
In the RGB color space mentioned above, the total bits per pixel are not always 32 bits. There is also a special case of 16 bits. First, 32 bpp means that each of the R, G, and B channels is represented by 8 bits. For example, red has 2^8 possible values, that is, 0 to 255. The remaining 8 bits are reserved for alpha. 16 bpp means that R, G, and B are represented by 5, 6, and 5 bits respectively. As for why G gets 6 bits instead of another value, it is said to be because the human eye is more sensitive to green. This is why these formats are also called RGB888 and RGB565.
RGB888 diagram

RGB565 diagram

For example, if we want to create a bitmap to represent RGB565, we can use hexadecimal 0x001f to represent one pixel. Converted to binary, that is 11111. At this point, it does not represent red, but blue, because missing high bits are padded with 0. From left to right means high bits to low bits, so the final value is actually 0000000000011111 to represent the color of one pixel, which is blue. With that in mind, we can create an RGB565 bitmap:
1
2
3
4
5
6
7
8
9
10
11
12
    static func makeData() -> UnsafeMutablePointer<UInt16> {
        let capacity = 200 * 200 * 2
        let imageBuffer = UnsafeMutablePointer<UInt16>.allocate(capacity: capacity)
        for row in 0..<200 {
            let color: UInt16 = row >= 100 ? 0x001f : 0x7e0
            for col in 0..<200 {
                imageBuffer[row * 200 + col] = color
            }
        }
        free(imageBuffer)
        return imageBuffer
    }
Here, for a 200 * 200 image, the upper half is set to 0x7e0, which is 0000011111100000, green, and the lower half is set to 0x001f, which is the blue we just mentioned. Then we generate an image through CGImage.
1
2
3
4
5
6
7
8
9
10
11
12
13
14
15
16
17
18
19
20
21
22
23
24
25
26
27
28
29
30
31
static var RGB565Image: UIImage? {
        let width = 200
        let height = 200
        let rawData = makeData()
        guard let data = Data(bytes: rawData, count: width * height * 2) as CFData?
            , let provider = CGDataProvider(data: data) else {
                return nil
        }

        let colorSpace = CGColorSpaceCreateDeviceRGB()
        let bitmapInfo =  CGBitmapInfo(rawValue: CGImageAlphaInfo.noneSkipFirst.rawValue | CGBitmapInfo.byteOrder16Little.rawValue)
        let imageRef = CGImage(width: width,
                               height: height,
                               bitsPerComponent: 5,
                               bitsPerPixel: 16,
                               bytesPerRow: width * 2,
                               space: colorSpace,
                               bitmapInfo: bitmapInfo,
                               provider: provider,
                               decode: nil,
                               shouldInterpolate: false,
                               intent: CGColorRenderingIntent.defaultIntent
        )

        guard let cgImage = imageRef else {
            return nil
        }

        let finalImage = UIImage(cgImage: cgImage)
        return finalImage
    }
Note the CGBitmapInfo parameters: there is no need for the alpha channel noneSkipFirst, and byteOrder16Little means 16-bit little-endian mode. I will not go into more detail here, but if you are interested, you can look it up.